You’re now tasked with migrating your web browser profile to your new computer. Where do you even begin, right? Well, there’s no need to worry. It’s not as complicated as you might think. In this post, you’ll learn how to copy your Firefox settings from one PC to another. You can create a Firefox account and use that to sync your data across devices, but this article is for those who would prefer to keep their private data stored locally.
Why
Copy Firefox Profile to a New Computer?
Technically, you don’t have to. You can go about your business and use Mozilla Firefox out of the box no problem. But for some users, that just won’t do. Some users invest time and effort to configure their web browsers to match their workflow. They download add-ons and save settings that work best for them. What they need is to open Firefox with all their settings intact so they can hit the ground running. Migrating settings from your old computer means having immediate access to your bookmarks, history, passwords (if saved), and add-ons. This also helps in recovering important data. No need to re-download or reconfigure anything.
How to
Move Firefox Profile
What you’ll need: access to your old and new computer as well as a USB stick. Note: In this tutorial, we’ll be using Windows 10. However, the migration process should be similar for older versions of Windows.
Copying
Old Firefox Settings
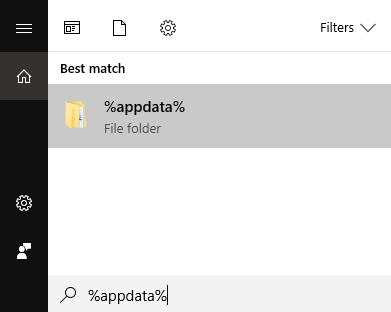
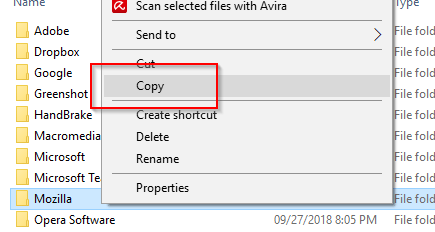
First, log into your old computer and make sure you close Firefox. Right-click the Start button. Click Search and type %appdata% before hitting Enter. This will open the AppData folder where Firefox data are saved along with data for other applications. Right-click the Mozilla folder and select Copy. Plug in your USB stick if you haven’t already. You can also use other forms of storage device that have read/write capabilities enabled. Paste the Mozilla settings onto your memory stick. Safely eject your USB and detach the device.
Transferring
the Files
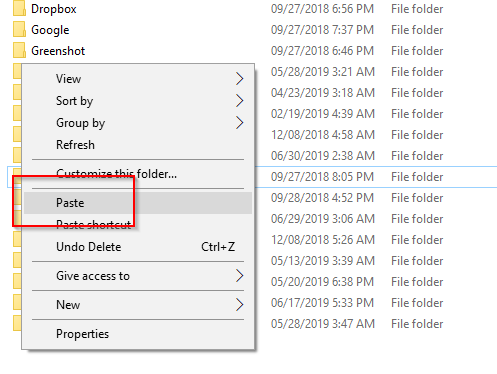
Open the new computer and plug your external storage device. Again, make sure that Firefox is closed. Copy the files on your external hard drive. Like what you did earlier, open the AppData folder. This time, instead of copying, paste the Mozilla folder in this location. Note: If a Mozilla folder already appears before you paste your old one, delete the existing one first. If successful, your new computer should be ready to use your old Firefox settings.
Configuring
Firefox
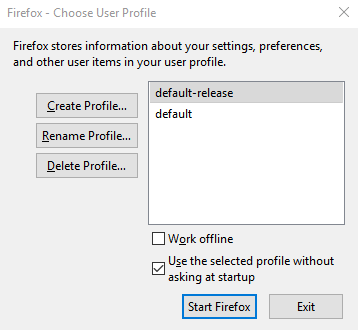
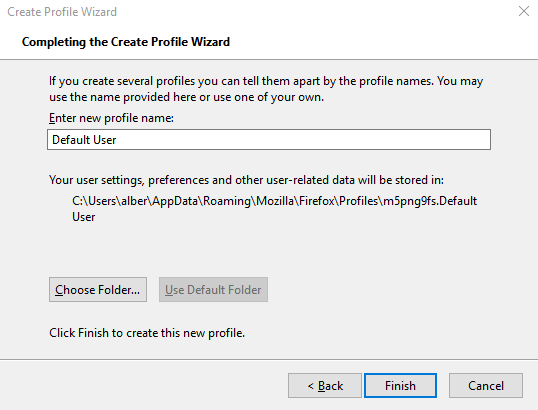
The last step is basically asking Mozilla to recognize the new settings you’ve added to the AppData folder. Open Search once more and type firefox.exe -p then press Enter. This will open the Firefox Choose User Profile window. You have three main options to choose from: Create Profile, Rename Profile, and Delete Profile. Since we’re creating a new default profile, select Create Profile. A new window will pop up, the Create Profile Wizard. Click Next to begin. In the next screen, you’ll be asked to create a new profile name (ignore the existing profile). Enter a name or leave the default option as is. Click Choose Folder. Double check to see if the folder location is correct. Firefox should be directed towards the default location which is: If everything’s in order, click Finish to exit the wizard. All that’s left is to select the newly created profile, exit Choose User Profile, and start Firefox. Now you can enjoy using Firefox with your imported settings applied.

